I love this time of year. With my tomato and pepper starts planted, my house is transformed from a deep winter bunker into a springtime botanical garden. The days are getting longer and my german-polish roots have me looking forward to Easter dinner and the pierogies that accompany that meal!
And yes, although I know I have my polish ancestors shaking their heads disapprovingly when I use the term “pierogies” (the plural of pierogi is pierogi and the singular actually pierog), I must admit the term gives me an acute nostalgia for my childhood.
While growing up, these were of course a gluten-full holiday entree. This year, I was excited to try my hand at making a gluten free version that rivaled my memories of my grandmother’s recipe. Her pierogies were stuffed with sauerkraut, fried onions or mashed potatoes mixed with cheese and onions. I’m pretty sure if faced with the, “if you could just take one food to a deserted island” question, my grandmother’s pierogies are exactly what I would choose.
Though my first batch turned out to be delicious, I had some casualties when my mashed potato filling leaked out when boiling. After some research, I stumbled upon this youtube video demonstrating the authentic pierogi sealing technique and went back over my seams about 3 times before I called them sealed!
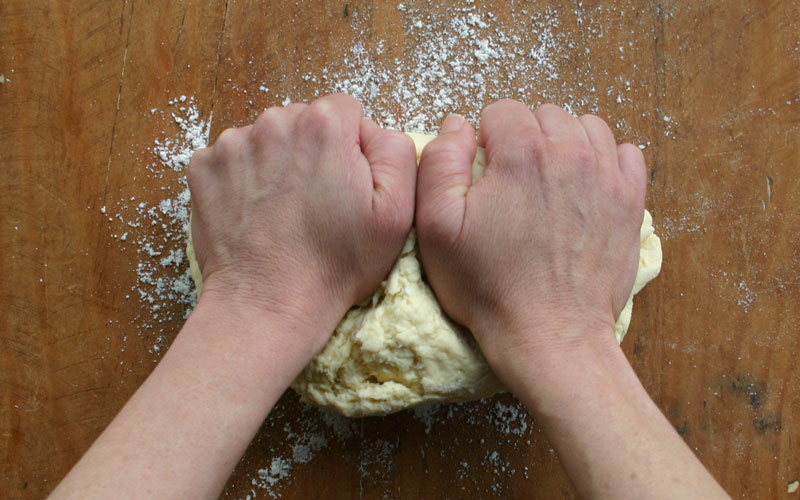
I wasn’t sure just what kind of consistency I was going to get with the gluten free flour – my dough was fairly sticky to start, but it turned out to be very manageable. When kneading the dough, make sure to keep your hands floured until it gets easier to handle. When I was done kneading, the dough was relatively smooth and I set it aside rest.
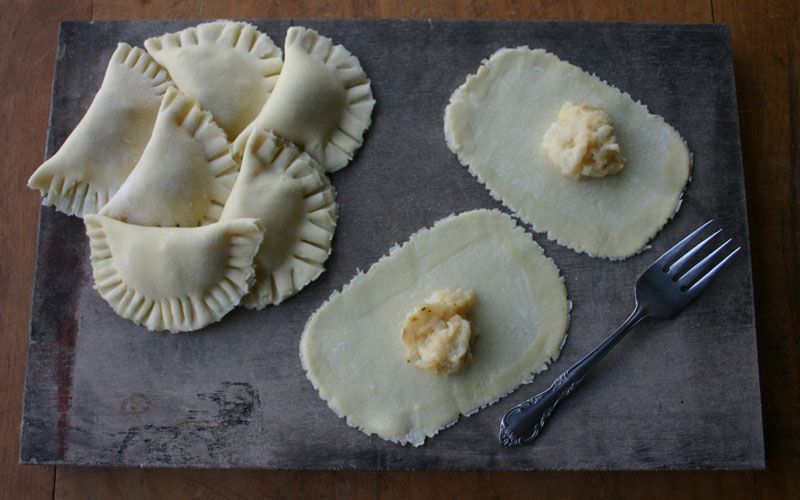
After making the filling, I rolled out the dough to 1/4 in making sure to keep it moving and on a well floured surface. The dough was easy to work with and I cut out rounds using a quart mason jar with a wide mouth that I happened to have on hand. The diameter of the my initial round was smaller than 4 inches, but I had plenty of dough to work with when I rolled it out for the second time to 1/8 of an inch thick.

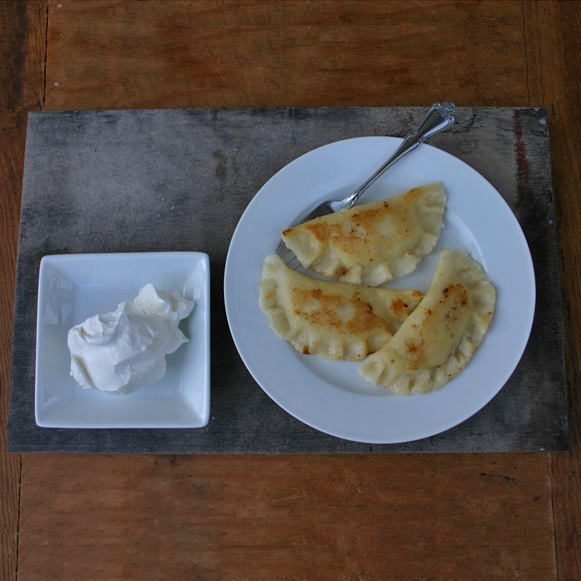
At first, I rolled my rounds into ovals, which worked fine, but I found that just keeping them round gave the same look of my grandmother’s. I also tried brushing the edges with butter and water to see if that would help them to stick together better, but found that the biggest help for that was in repeating the pinching process up to 3 times to get them to seal really well. Finally, boil and sauté the pierogies and serve with sour cream or more sautéed onions and enjoy!
Gluten Free Pierogi

Gluten free potato and cheese pierogi
For Filling
- 1 pound potatoes
- 1 small onion (peeled and diced)
- 2 tablespoons clarified butter or olive oil
- 1/2 cup sour cream
- 1/2 cup shredded cheese
- Kosher salt and freshly ground black pepper (to taste)
For Dough
- 1/2 cup sour cream
- 2/3 cup milk
- 1 egg (beaten)
- 1/8 teaspoon kosher salt
- 2 1/2 cups of an all purpose gluten free flour. (I used the Columbia Gorge Gluten Free General Baking Mix)
- 1 teaspoon xanthan gum (omit if the blend you are using already contains it)
- For the dough, place the sour cream, milk, beaten egg and salt in a large bowl and whisk to combine well.
- Add the flour and xanthan gum in two parts. Mix well after each addition. (The dough will be smooth but still a bit sticky.)
- Turn the dough out onto a lightly floured surface, and, with floured hands, knead the dough. Keep kneading until it’s easier to handle. Cover with plastic wrap and set aside.
- For the filling, peel potatoes and cut into one inch pieces.
- Bring a large pot of salted water to a rolling boil, add the potatoes and reduce the boil to a simmer.
- Boil the potatoes for about 15 to 20 minutes until they are tender.
- While the potatoes are cooking, place the diced onion and clarified butter in a skillet and cook, stirring frequently, until the onions are translucent (about 5 minutes).
- Once the potatoes are cooked, mash them in the pot, add the cooked onions, sour cream, shredded cheese and the salt and pepper to taste. Set the filling aside.
- On a lightly floured surface, roll out the dough into a round about 1/4 inch thick.
- Move the dough frequently and lightly dust with flour to prevent sticking.
- Cut out 3.5 to 4 inch rounds from the dough. (I used the top of a mason jar.)
- Gather and reroll scraps.
- Roll each round so that is closer to 1/8 inch thick.
- While holding the round, place about 1 tablespoon of filling in the center of each. (You can make the filling ahead of time too.)
- Fold the dough in half, matching the edges and pinch the edges together to form a tight seal. You may need to go over the edge two to three times to get a good seal.
- Place 4 to 6 pierogies in a pot of boiling salted water and boil for about 3 minutes – until they float to the surface.
- With a slotted spoon, carefully remove the boiled pierogies and place them on a paper towel to drain to dry.
- Saute the pierogies in butter or clarified butter until browned (about 2 minutes per side). Serve immediately.
Leave A Comment